GITHUB 腾讯镜像访问
地址映射:https://mirrors.tencent.com/github.com/{group}/{repo}/ 参考以下示例: 用户:https://mirrors.tencent.com/github.com/terrywh 项目:https://mirrors.tencent.com/github.com/github.com/clash-verge-rev/clash-verge-rev 发布:https://mirrors.tencent.com/github.com/kingToolbox/WindTerm/releases 注意: 由于实际映射地址中的链接并未进行变更,会发生跳转回 github.com 或 404 not found 的情况;

OPENSSL 字签证书(域名、IP)
生成 ROOT/CA 根证书 openssl req -x509 -nodes -new -sha256 -days 1024 -newkey rsa:2048 -keyout root_ca.key -out root_ca.pem -subj "/C=CN/O=Orgnization/OU=OrgizationUnit/CN=CommonName" openssl x509 -outform pem -in root_ca.pem -out root_ca.crt 签发证书 配置文件 注意: 缺失 nonRepudiation 在新版本 Chrome 中导致 SSL_ERR_IMCOMPATIBLE 错误无法继续访问;(更新:2023-12-22) 该配置文件实际在 签发申请 和 签发证书 时都需要使用; # filename="server.conf" [req] distinguished_name = req_dn req_extensions = req_ext x509_extensions = x509_ext prompt = no [req_dn] C = CN ST = Beijing L = Beijing O = Orgnization OU = OrgnizationUnit CN = CommonName [req_ext] keyUsage = nonRepudiation, keyEncipherment, dataEncipherment extendedKeyUsage = serverAuth [x509_ext] keyUsage = nonRepudiation, keyEncipherment, dataEncipherment subjectKeyIdentifier = hash extendedKeyUsage = serverAuth subjectAltName = @alt_names [alt_names] DNS.1 = *.domainname.com IP.2 = 10.0.0.1 签发申请 openssl req -new -nodes -newkey rsa:2048 -keyout server.key -out server.csr -config server.conf 签发证书 openssl x509 -req -sha256 -days 1024 -in server.csr -CA root_ca.pem -CAkey root_ca.key -CAcreateserial -extfile server.conf -extensions x509_ext -out server.crt
C++ 表达式求值顺序
这两天突然碰到的一个问题,在开发和正式环境由于切换编译器导致了一些问题;下面的示例代码演示: #include <iostream> int test_evaluate_order(int a, int b, int c) { return a + b + c; } int fa() { std::cout << "1" << std::endl; return 1; } int fb() { std::cout << "2" << std::endl; return 2; } int fc() { std::cout << "3" << std::endl; return 3; } int main() { test_evaluate_order(fa(), fb(), fc()); return 0; } 上述代码在编译执行时: 在 clang v9.0.0 版本下,运行输出: 1 2 3 在 gcc v9.1 版本下,运行输出: 3 2 1 参见:CompilerExplorer
PHP 静态链接 OPENSSL/NGHTTP2 及外部扩展
{{page.title}} 注意: 以下过程是为 使用链接 openssl 静态库, 方便部署规划的编译配置; 使用动态连接的情况很多流程可以简化(无需对 config.m4 进行修改); openssl 1.1.1b CC=gcc CXX=g++ ./Configure no-shared --prefix=/data/vendor/openssl-1.1.1 linux-x86_64 nghttp2 1.38.0 PKG_CONFIG_PATH=/data/vendor/openssl-1.1.1/lib/pkgconfig CC=gcc CXX=g++ CFLAGS=-fPIC CXXFLAGS=-fPIC ./configure --prefix=/data/vendor/nghttp2-1.38.0 --enable-shared=no --enable-lib-only # --with-boost=/data/vendor/boost-1.70.0 --enable-asio-lib curl 7.64.1 CC=gcc CXX=g++ CFLAGS=-fPIC CPPFLAGS=-fPIC ./configure --prefix=/data/vendor/curl-7.64.1 --with-nghttp2=/data/vendor/nghttp2-1.38.0 --with-ssl=/data/vendor/openssl-1.1.1 --with-pic=pic --enable-ipv6 --enable-shared=no --without-libidn2 --disable-ldap --without-libpsl --without-lber --enable-ares php 7.2.18 CC=gcc CXX=g++ ./configure --prefix=/data/vendor/php-7.2.18 --with-config-file-path=/data/vendor/php-7.2.18/etc --disable-simplexml --disable-xml --disable-xmlreader --disable-xmlwriter --with-readline --enable-mbstring --without-pear --with-zlib --build=x86_64-linux-gnu ldd 扩展 cd ext/***** /data/vendor/php-7.2.17/bin/phpize mv config0.m4 config.m4 扩展 openssl.so CC=gcc CXX=g++ LDFLAGS="-pthread -ldl" ./configure --with-php-config=/data/vendor/php-7.2.17/bin/php-config --with-openssl=/data/vendor/openssl-1.1.1 --build=x86_64-linux-gnu 扩展 curl.so 调整 config.m4 以忽略内部检查(检查本身会引起链接问题)
SERVER INITIALIZATION
更新:2024-03-26 BASIC apt update apt upgrade apt install aria2 build-essential cmake libpcre3-dev libssl-dev zlib1g-dev mkdir -p /data/server/v2ray BBR # 验证 lsmod | grep bbr # 挂载 modprobe tcp_bbr echo "tcp_bbr" >> /etc/modules-load.d/modules.conf # 启用 echo "net.core.default_qdisc=fq" >> /etc/sysctl.conf echo "net.ipv4.tcp_congestion_control=bbr" >> /etc/sysctl.conf # 生效 sysctl -p NGINX cd ~ wget http://nginx.org/download/nginx-1.25.4.tar.gz tar xf nginx-1.25.4.tar.gz cd nginx-1.25.4 ./configure --with-http_ssl_module --without-select_module --with-http_v2_module --with-http_gzip_static_module --prefix=/data/server/nginx make -j2 make install Certificate mkdir -p /etc/letsencrypt/live/ scp -r root@source_host:/etc/letsencrypt/live/terrywh.net /etc/letsencrypt/live/ certbot certonly -d "*.terrywh.net" --manual --preferred-challenges dns certbot renew START /data/server/nginx/sbin/nginx aria2c --conf-path=/data/htdocs/downloads.terrywh.net/etc/aria2.conf /data/server/v2ray/v2ray --config /data/server/v2ray/config.json &>/dev/null & GCC 安装新版本 GCC/LLVM 请参考 [新版本 GCC/LLVM 安装]({% link _notes/compiler-setup.md %})
修复 LINUX/GRUB 启动配置
尝试在 Linux 下工作了一段时间,安装了 N 多个种类发行版本,最终本着“不折腾”原则停留在了 Deepin,比较一下安装的几个版本感觉: Ubuntu 安装过程很流畅,完成后简单换了下安装源,Gnome 尝试了几个开发工具写了些代码,大概持续了 4 天,实在搞不定 QQ / TIM (使用 Wine 能启动,要么无法输入,要么一堆框框,要么字体太丑);很几个工具出现输入法相关的问题,换 fcitx 后有缓解,但还有无法输出的应用。 Archlinux 从头安装一般人搞不了:安装过程查了各种“教程”,由衷的感觉自己对 Linux 底层了解还是太少,很多操作根本不知到干什么;当然,结果 OK 还是装上了,安装桌面环境尝试了 KDE 和 XFCE,最终觉得安装走的太糊涂,而且实在需要配置太多东西,遂放弃。 Antegros 基于 Archlinux 的发行版本,官网感觉比下面这个漂亮点,结果这个最搞笑;重启、重试安装了 N 多回,每次在所有配置完毕开始安装的时候提示“请稍候…”,然后就,没有然后了… Manjaro 对这个抱着希望最大,安装、初期使用都很不错,碰到的诡异问题在网上搜索到的结果都是1年前:网卡断开后无法重连;我需要配置 802.1 安全协议,做配置就要断开,断开就连不回来;后来以为网卡驱动问题,尝试良久未果,一度导致完全无法联网,放弃。 Deepin 本来选择 Arch 系列就是奔着移植的 Deepin 版本的 QQ/TIM 去的,所以想着干脆回到本家试试;尝试感受不错,各种东西都稳定,碰到一点点小问题,使用自带的驱动管理器安装闭源版本驱动失败(重启提示无法启动 Display 然后恢复开源驱动),但是关闭桌面,从纯命令行安装后一切正常;目前装了 Linux 版本 Steam 的 Dota2 来国服合同事来了两把没碰到问题。 在安装过程中经常碰到 Grub 无法正确引导的情况,大部分使用下面命令解决: # 确认启动 boot 分区位置 ls ls (hd1,gpt4) # 设置启动目标参数 set root=(hd1,gpt4) set prefix=(hd1,gpt4)/boot/grub # 启动 insmod normal normal 实际在进入 Linux 后需要重新安装或配置 GRUB 这里一般是:
PHP-FLAME
https://github.com/terrywh/php-flame Flame 是一个基于协程的异步网络开发框架(PHP扩展)类似 Swoole 但相对更简单一些: <?php // 框架初始化 flame\init("http_server_demo"); // 第一个(主)协程 flame\go(function() { // 创建 HTTP 服务器(监听) $server = new flame\http\server(":::56101"); $server ->before(function($req, $res) { // 前置处理器(HOOK) $req->data["before"] = flame\time\now(); // 记录请求开始时间 }) ->get("/hello", function($req, $res) { // 路径处理器 // 简单响应方式 $res->status = 200; $res->body = "world"; }) ->post("/hello/world", function($req, $res) { // 路径处理器 // Transfer-Encoding: Chunked $res->write_header(200); $res->write("CHUNKED RESPONSE:") $res->write($res->body); $res->end(); }) ->after(function($req, $res, $r) { // 后置处理器(HOOK) flame\log\trace($req->method, $req->path // 请求时长日志记录 , "in", (flame\time\now() - $req->data["before"]), "ms"); if(!$r) { $res->status = 404; $res->file(__DIR__."/404.html"); // 响应文件 } }); $server->run(); }); // 启动(调度) flame\run();
ATOM 插件 GO-PLUS 配置 GOROOT
由于需要在同一台机器部署两种 GO 环境(WSL + Win),这里对 go-plus 代码进行一点点修改,加入 goroot 配置参数来解决这个问题: // ~/.atom/packages/go-plus/lib/config/environment.js // ... // const getenvironment = (): {[string]: ?string} => { // ... if (!e.GOROOT) { let r = atom.config.get("go-plus.config.goroot") if (r && r.trim() !== '') { e.GOROOT = r } } // e.GINKGO_EDITOR_INTEGRATION = 'true' // return e // } 即通过配置参数 go-plus.config.goroot 模拟环境变量。

注册表常用设置
各处收集到的各种调整 Windows 配置相关的注册表项,记录以备不时之需~ HKEY_CURRENT_USER\Software\Microsoft\Windows\CurrentVersion\Explorer\Advanced\DisabledHotkeys (REG_EXPAND_SZ) “SA” - 禁用 Win + S/A 快捷键 HKEY_LOCAL_MACHINE\SYSTEM\CurrentControlSet\Control\Power\PowerSettings\7516b95f-f776-4464-8c53-06167f40cc99\8EC4B3A5-6868-48c2-BE75-4F3044BE88A7 (REG_DWORD) 0x00000002 - 开启额外的电源设置 “控制台锁定后显示关闭超时” HKEY_CURRENT_USER\Software\Classes\CLSID\{018D5C66-4533-4307-9B53-224DE2ED1FE6}\System.IsPinnedToNameSpaceTree (REG_DWORD) 0x00000000 - 隐藏 OneDrive 在 Explorer 左侧列表项 HKEY_LOCAL_MACHINE\SYSTEM\CurrentControlSet\Control\TimeZoneInformation (REG_DWORD) 0x00000001 - 标识 Bios 时间为 UTC 标准时间(配合 LINUX 双系统)
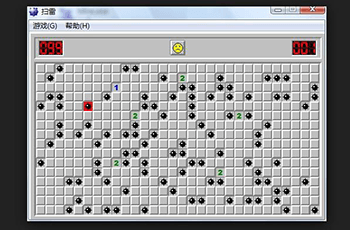
扫雷(四)雷区完善(递归打开、随机布雷)
在 第三章 中我们基本完成了雷区的绘制和布雷相关接口功能,我们留下了一个未完成的功能,“一次性打开连续的空格”。在开始编写主要游戏流程前,我们先把这里完成。** 打开连续的空格(递归、边界条件) 打开连续空格这个过程,大概可以描述为: 如果当前要打开的格子,是空格,打开当前各自周围的其他格子。 打开其他格子时,采用 1 中的逻辑。 上面这种反复使用同样逻辑,并有“逐级深入”表现的程序一般就可以称作“递归”。简单说,如果某个函数的功能实现中还会出现调用自身的情况,就造成了“递归”。 我们先用递归方式实现“打开连续空格子”这个功能(将 minesweeper-field.js 文件中 openCell() 函数调整为如下内容): // 打开指定的格子 function openCell($cell) { if(!$cell || $cell.find(".mask").prop("hidden")) { // 连续打开的停止边界条件 return; // 1. 当前格子不存在(向周围寻找时超出了雷区范围) // 2. 遇到了已经打开的格子 } // 当前格子是整个雷区的左上角,那么它的左上等元素都是不存在 // 打开当前格子 $cell.find(".mask").prop("hidden", true) // !!!! 隐藏遮罩层 !!!! // 从当前格子元素读取其坐标,便于找到周围元素 var x = $cell.data("x"), y = $cell.data("y"); if(nums[x+":"+y] === 0) { // 如果当前格子是空格 // 打开当前格子周围的格子 // 我们给打开周围格子,加入适当的延迟 // 这样能够看到一种类似波浪的动画效果 setTimeout(openCell, 10, cells[(x-1)+":"+(y-1)]) // 左上 setTimeout(openCell, 20, cells[( x )+":"+(y-1)]) // 上 setTimeout(openCell, 30, cells[(x+1)+":"+(y-1)]) // 右上 setTimeout(openCell, 40, cells[(x-1)+":"+( y )]) // 左 setTimeout(openCell, 50, cells[(x+1)+":"+( y )]) // 右 setTimeout(openCell, 60, cells[(x-1)+":"+(y+1)]) // 左下 setTimeout(openCell, 70, cells[( x )+":"+(y+1)]) // 下 setTimeout(openCell, 80, cells[(x+1)+":"+(y+1)]) // 右下 } } 细心的各位可能又发现,我们把上一章“隐藏遮罩层”的代码由:.hide() 调整为 .prop("hidden",true)。 这里主要的目的是使用 .prop("hidden") 读取当前的 隐藏状态,以确定是否继续打开格子。 当然使用 .hide() 时也能够判断状态,对应的代码类似 .css("display") == "none"。 为了统一,我们也将 reset 接口中显示遮罩层的逻辑使用 .prop() 重新实现: